Gluten-Free Pasta that Behaves (Homemade Recipe)
I have finally fine-tuned a recipe for gluten-free pasta which holds together and tastes fabulous, plus has a great texture. It’s not gritty or tough. I do believe that based on your altitude, you may find the need to add or decrease the water to get the right consistency, so keep that in mind as you move forward with this recipe. I live at a very high altitude which is a double whammy with the gluten-free factor 🙂 But, pasta dough is right when it FEELS right on your fingers; not too sticky and very malleable, as you’ll see in my video. This particular pasta recipe is designed to make a lasagna in a 13×9 pan – so enough pasta for about 8 servings. This recipe is simply about making the pasta and not the lasagna recipe! I will add the lasagna recipe soon I promise 🙂 You can roll these noodles out by hand and leave them as lasagna noodles, or you can slice them into wide noodles for immediately boiling and making pasta noodles. If you have a pasta machine – you’ve got several options!
Ingredients
- 2 3/4 cups of Antimo Caputo Gluten Free Flour
- 4 eggs
- 1/2 cup water
Directions
Step One
Begin by placing 2 and 3/4 cups of Antimo Caputo Gluten Free Flour in a bowl. Place your 1/2 cup of water in a dish that allows you to add the water gradually. Set aside the water.
Step Two
Crack all four eggs into the flour. Stir with a fork or a very sturdy whisk (I personally prefer a fork).
Step Three
Begin to gradually add the water to your eggs and flour mixture. As it begins to get mixed it will look quite messy and unmanageable – this will change! Keep stirring. As it begins to stick together a bit, use one hand to mix the dough and if needed, put a little flour on your hand or in the bowl, to keep it from sticking too much. Use your hand to continually swoop around the inside of the bowl, gathering the dough as you go.
Slowly add water and stop when you feel that it’s sticky, but not TOO sticky. In other words, the dough sticks together, but it does not stick to your hand very much. This is a process you will learn and get better at as you begin to get a feel for dough and how dough works within your climate and your kitchen.
Use your hand to continually wrap the dough into a ball. As the ball gets bigger, continue to use the ball of dough to force the rest of the dough in the bowl to stick to the ball. I twirl my bowl as my hand continually swirls around the inside of the bowl, gathering dough onto the ball. If there is dough stuck to the bottom of the bowl, I add a few drips of water to get the dough to stick to my ball of dough. See my video here for technique.
Step Four
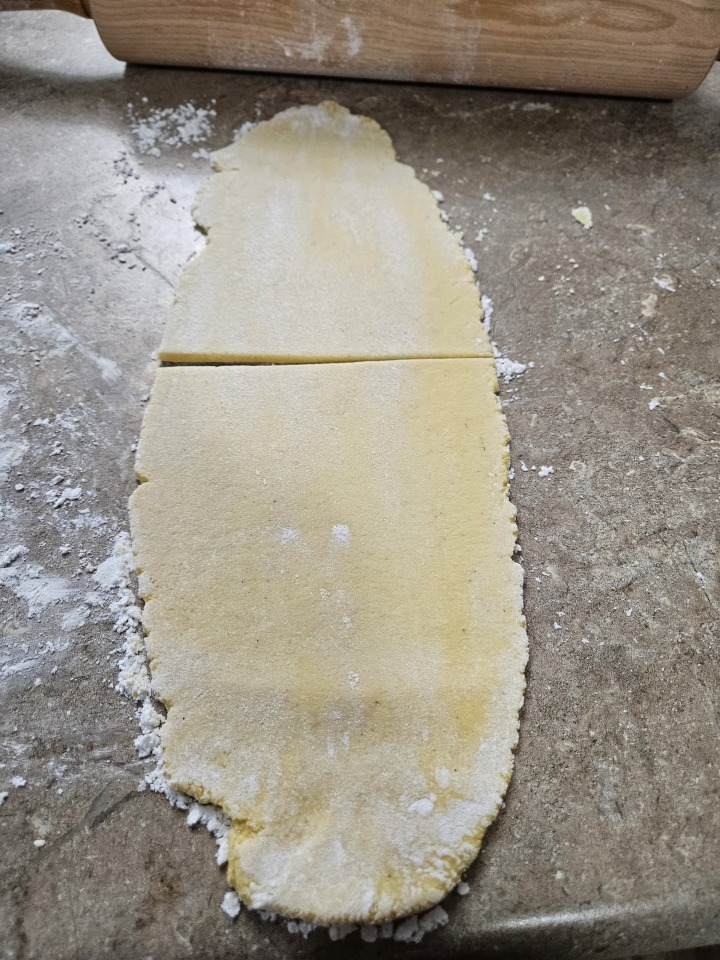
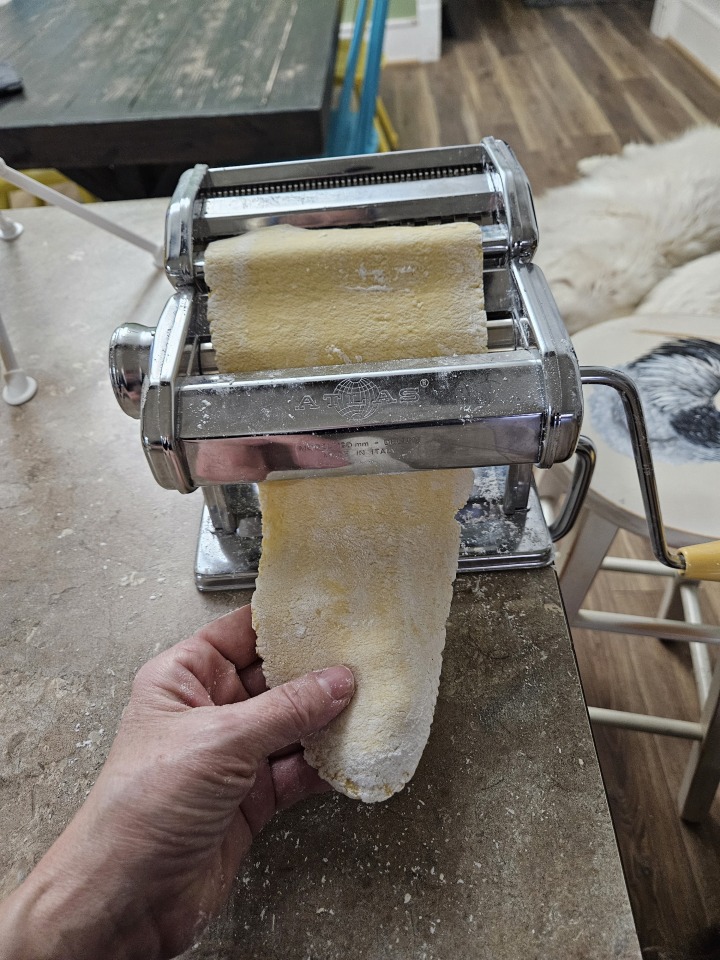
Once you have a complete ball of dough you are going to place flour on your counter and spread the flour out with your hand. Then begin to roll the dough a bit with your hands – your goal will be to shape it into a rectangle. You will shape the dough, sprinkle a little flour on it as needed, and flip. Shape/flip again. Sprinkle a little flour if it’s sticking to your counter. Repeat this process until you are able to shape the dough into a rectangle and flip it easily without it sticking to the counter. I recommend taking the rectangle of dough, once it is nice and flat and not sticky, and cutting it into four or five equal pieces. Now, you can begin to use a rolling pin to make your dough thinner by rolling out each of the pieces. Repeat this process until the noodles are to a thickness that you like. If you have a pasta machine, you can use the machine (as seen in my video) to make thinner lasagna noodles or pasta noodles. Or, you can simply cut the noodles by hand! No pasta machine is needed.
Step Five
When you have created your noodles, let them dry completely if you do not plan to use them right away. I hang mine on a rack that fits nicely on my counter, and the rack is also stored compactly when I’m done. When the pasta has dried completely I place it in a plastic bag in the freezer. If you plan to use the pasta right away, you can add it immediately to a lasagna dish with your other ingredients (no boiling needed). Or, if you are making pasta noodles, toss them into boiling water with salt and be prepared to test them to determine when they are ready. I typically add a tablespoon of kosher salt.
The question I cannot answer for you, is how long they should boil. Begin to start testing after one minute of boiling! If you like thick noodles, it will take longer obviously. Thin noodles cook faster. Test the noodles and pull from the stove when they are chewy enough for you, but not falling apart. I would guess no longer than five to six minutes, but it’s all dependent on your noodles, your stove and your climate. Also, if you do not use Antimo Caputo Gluten-Free Flour I have NO clue what will happen! I use this recipe only with Antimo Caputo Gluten-Free Flour.
Homemade Gluten-Free Pasta
Ingredients
- 2 3/4 cups of Antimo Caputo Gluten Free Flour
- 4 eggs
- 1/2 cup water
Instructions
- Begin by placing 2 and 3/4 cups of Antimo Caputo Gluten Free Flour in a bowl. Place your 1/2 cup of water in a dish that allows you to add the water gradually. Set aside the water.
- Crack all four eggs into the flour. Stir with a fork or a very sturdy whisk (I personally prefer a fork).
- Begin to gradually add the water to your eggs and flour mixture. As it begins to get mixed it will look quite messy and unmanageable – this will change! Keep stirring. As it begins to stick together a bit, use one hand to mix the dough and if needed, put a little flour on your hand or in the bowl, to keep it from sticking too much. Use your hand to continually swoop around the inside of the bowl, gathering the dough as you go.Slowly add water and stop when you feel that it's sticky, but not TOO sticky. In other words, the dough sticks together, but it does not stick to your hand very much. This is a process you will learn and get better at as you begin to get a feel for dough and how dough works within your climate and your kitchen.Use your hand to continually wrap the dough into a ball. As the ball gets bigger, continue to use the ball of dough to force the rest of the dough in the bowl to stick to the ball. I twirl my bowl as my hand continually swirls around the inside of the bowl, gathering dough onto the ball. If there is dough stuck to the bottom of the bowl, I add a few drips of water to get the dough to stick to my ball of dough.
- Once you have a complete ball of dough you are going to place flour on your counter and spread the flour out with your hand. Then begin to roll the dough a bit with your hands – your goal will be to shape it into a rectangle. You will shape the dough, sprinkle a little flour on it as needed, and flip. Shape/flip again. Sprinkle a little flour if it's sticking to your counter. Repeat this process until you are able to shape the dough into a rectangle and flip it easily without it sticking to the counter. I recommend taking the rectangle of dough, once it is nice and flat and not sticky, and cutting it into four or five equal pieces. Now, you can begin to use a rolling pin to make your dough thinner by rolling out each of the pieces. Repeat this process until the noodles are to a thickness that you like. If you have a pasta machine, you can use the machine (as seen in my video) to make thinner lasagna noodles or pasta noodles. Or, you can simply cut the noodles by hand! No pasta machine is needed.
- When you have created your noodles, let them dry completely if you do not plan to use them right away. I hang mine on a rack that fits nicely on my counter, and the rack is also stored compactly when I'm done. When the pasta has dried completely I place it in a plastic bag in the freezer. If you plan to use the pasta right away, you can add it immediately to a lasagna dish with your other ingredients (no boiling needed). Or, if you are making pasta noodles, toss them into boiling water with salt and be prepared to test them to determine when they are ready. I typically add a tablespoon of kosher salt.The question I cannot answer for you, is how long they should boil. Begin to start testing after one minute of boiling! If you like thick noodles, it will take longer obviously. Thin noodles cook faster. Test the noodles and pull from the stove when they are chewy enough for you, but not falling apart. I would guess no longer than five to six minutes, but it's all dependent on your noodles, your stove and your climate. Also, if you do not use Antimo Caputo Gluten-Free Flour I have NO clue what will happen! I use this recipe only with Antimo Caputo Gluten-Free Flour.


